How to Create a Chart with an If Statement in Excel
In this Excel charting tutorial, you will learn how to create a chat with if statement. The if condition in Excel is created in the data series. They can be used as checkboxes to change the charts as per the requirements.
In Excel, you can use an if statement to create a chart that dynamically changes based on the value of a cell. This is a useful technique for creating charts that can be customized to show different data sets.
How to Use an If Statement in a Chart
To use an if statement in a chart, you first need to create a new column that contains the if statement. The if statement should have two arguments: the value of the cell that you want to test, and the value that you want the chart to show if the cell value is true.
For example, the following if statement would create a chart that shows the sales of product A if the value in cell J1 is equal to 1, and the sales of product B if the value in cell J1 is equal to 2:
=IF(J1=1,"Sales of Product A","Sales of Product B")
Once you have created the if statement column, you can then create the chart. When you create the chart, make sure to select the column that contains the if statement as the data series.
How to Use Checkbox Controls to Change the Chart
You can also use checkbox controls to change the chart dynamically. To do this, first add a checkbox control to the worksheet. Then, link the checkbox control to the cell that contains the if statement.
When you select the checkbox control, the value of the cell that contains the if statement will change, and the chart will automatically update to reflect the new value.
Iserting a chart with if condition
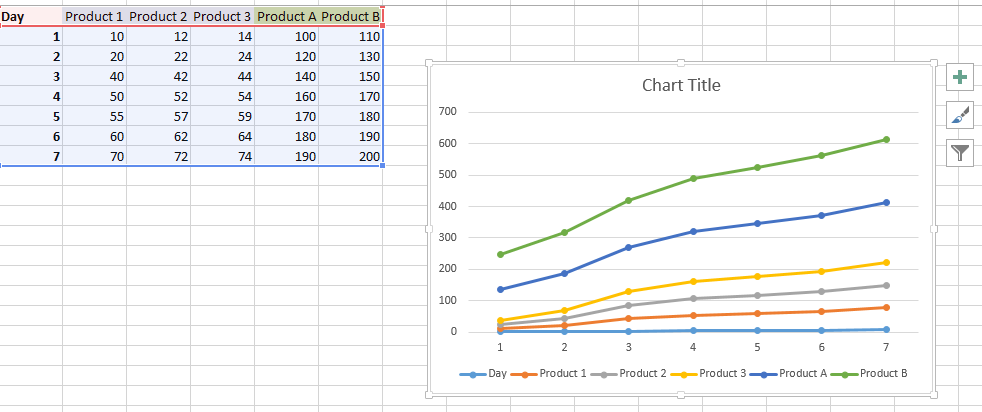
Let us start by creating chart data for the same.
Now we can clearly see that there are two categories of products. Simple if graph looks like this:
Now you will start by creating the options for the same. You created new columns that have the following formulas: =IF(J1,C1,E1)
The if condition decides if the chart will have column C or E as its series.
So, based on the value in cell J1, it can be product2 or Products A =IF(J1,D1,F1)
The if condition decides if the chart will have column D or F as its series.
Based on the value in cell J1, it can be product3 or Products B.
At this point, you need to know how to insert checkbox in Excel. We have added a checkbox and linked it to the cell j1. In the what-if graph, we have changed the series types, including product1 and the last 2 column products, which can vary.
How if condition works in a what if chart?
Unchecking the option:
You can add more such checkboxes. You will receive a chart with checkboxes.
Based on such a plot with checkboxes, you can perform a what if analysis in Excel.
You can easily check the same thing in the linked file.
Limitations of Using If Statements in Charts
While using if statements in charts can be a useful technique, there are some limitations to consider.
- Complexity: If statements can become complex, especially if you are working with multiple conditions. This can make it difficult to troubleshoot problems and to maintain the charts.
- Performance: If statements can slow down the performance of charts, especially if you are working with large data sets.
- Flexibility: If statements are limited to simple logical comparisons. This can make it difficult to create charts that are more sophisticated.
If you are working with a simple data set and you need to create a chart that dynamically changes based on the value of a cell, then using an if statement is a good option. However, if you are working with a large data set or you need to create a more sophisticated chart, then you may want to consider using a different approach.
Here are some alternatives to using if statements in charts:
- Use a pivot table: A pivot table is a powerful tool that can be used to summarize and analyze data. You can use a pivot table to create charts that show different data sets based on the values in a specific column.
- Use a macro: A macro is a set of instructions that can be used to automate tasks. You can use a macro to create charts that dynamically change based on the value of a cell.
- Use a third-party add-in: There are a number of third-party add-ins that can be used to create dynamic charts. These add-ins offer more flexibility and features than the built-in Excel charting tools.
By considering the limitations of using if statements in charts, you can choose the best approach for your needs.
Key Takeaways
- You can use an if statement in Excel to create a chart that dynamically changes based on the value of a cell.
- To use an if statement in a chart, you first need to create a new column that contains the if statement.
- You can also use checkbox controls to change the chart dynamically.
- Creating a chart with an if statement is a useful technique for creating dynamic charts that can be customized to show different data sets.
- You better learn how to use if function in Excel.
FAQ
- Q: What are the limitations of using if statements in charts?
- A: If statements can become complex, especially if you are working with multiple conditions. This can make it difficult to troubleshoot problems and to maintain the charts. If statements can also slow down the performance of charts, especially if you are working with large data sets. If statements are limited to simple logical comparisons, which can make it difficult to create charts that are more sophisticated.
- Q: What are the alternatives to using if statements in charts?
- A: You can use a pivot table, a macro, or a third-party add-in to create dynamic charts. Pivot tables are powerful tools that can be used to summarize and analyze data. Macros are sets of instructions that can be used to automate tasks. Third-party add-ins offer more flexibility and features than the built-in Excel charting tools.
Leave a Reply