How to Insert Checkbox in Excel
A check box is a form control that allows users to select or deselect an option. Check boxes can be used to create interactive forms, surveys, and data filters. In this lesson you will learn how to insert check box to the worksheet In Excel.
Why you need one?
Check box enables or disables a value indicating alternatives with a specific meaning. In the worksheet or in a group box you can tick more than one box at a time. The check box can be used, for example in the order form containing a list of available products or inventory tracking application to indicate whether a particular product has been discontinued.
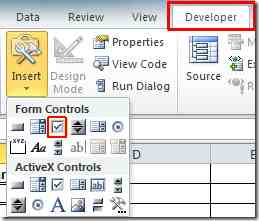
Go to the Ribbon > Developer tab.
How to insert?
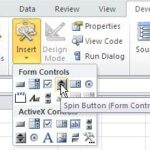
Click Insert and select a form control check box and place it on the sheet.
By right-clicking on a control you can edit the name of the button, the assigned macro, and other parameters. Click the Format Control.
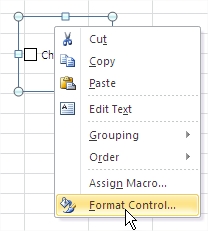
You will see a window object formatting. Go to the tab control fill in the cell link pointing to a cell in the spreadsheet link eg C2. You can specify the cell link that will be updated with the checkbox status (either True or False), and set other options such as the checkbox size, font, and font color.
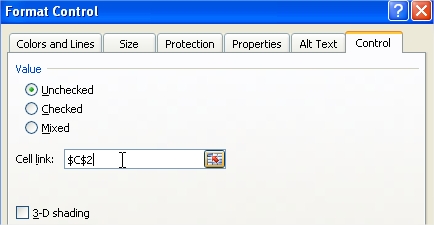
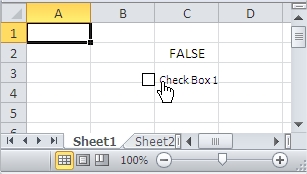
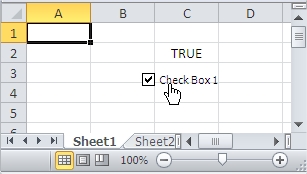
You connected a link to cell C2, which according to click on a checkbox appears logical value “TRUE” or “FALSE”.
False
True
How to use the IF function to handle the logical value returned by the check box
You can use the IF function to handle the logical value returned by the check box. For example, the following formula will display the text “AVAILABLE” if the checkbox in cell C2 is selected, and the text “UNAVAILABLE” if the checkbox is deselected:
=IF(C2=TRUE,”AVAILABLE”,”UNAVAILABLE”)
ou can also use the IF function to control the visibility of data. For example, the following formula will show the pivot table in cell A1 if the checkbox in cell C2 is selected, and hide the pivot table if the checkbox is deselected:
=IF(C2=TRUE,A1,””)
How to link a check box to a cell
To link a check box to a cell in Excel, right-click on the check box and select Format Control. In the Format Control dialog box, go to the Control tab and enter the cell reference into the Cell link field.
When the check box is selected, the TRUE value will be stored in the linked cell. When the check box is deselected, the FALSE value will be stored in the linked cell.
Using Check Boxes to Create a Quiz in Excel
Check boxes can be used to create interactive quizzes in Excel. This can be a fun and effective way to test your students’ knowledge on a particular topic.
To create a quiz using check boxes, follow these steps:
- Create a new Excel worksheet.
- In the first column, list the questions for your quiz.
- In the second column, insert a check box for each question.
- Link each check box to a cell in the worksheet.
- In the third column, use the IF function to display the correct answer to each question.
For example, the following formula would display the text “CORRECT” if the check box for question 1 is checked and the text “INCORRECT” if the check box is unchecked:
=IF(C2=TRUE,”CORRECT”,”INCORRECT”)
You can also use the IF function to display a different message depending on the number of questions that the user gets correct. For example, the following formula would display the message “You got 3 out of 5 questions correct” if the user gets 3 out of 5 questions correct:
=IF(COUNTIF(C2:C6,”CORRECT”)=3,”You got 3 out of 5 questions correct”,”You need to improve your study habits”)
Once you have created your quiz, you can save the worksheet as a template. This will allow you to easily create new quizzes for different topics.
Use check boxes to create dynamic validation lists
Check boxes can be used to create dynamic validation lists. This is a powerful technique that can be used to create forms and surveys that are more user-friendly and efficient.
To create a dynamic validation list, you will need to use the INDIRECT function. The INDIRECT function converts a text string into a cell reference.
For example, the following formula would create a dynamic validation list that contains the names of all of the products that are marked as “AVAILABLE” in the worksheet:
=INDIRECT(“C2:C10”)
where C2:C10 is the range of cells that contains the check boxes for the products.
Use check boxes to control the input of data
Check boxes can be used to control the input of data into cells. This can be useful for preventing users from entering invalid data.
For example, you could create a check box that is linked to a cell that contains a date. If the check box is unchecked, the user would not be able to enter a date into the cell.
To do this, you would need to use the DATA VALIDATION function. The DATA VALIDATION function allows you to set rules for the data that can be entered into a cell.
Use check boxes to create dynamic dashboards
Check boxes can be used to create dynamic dashboards in Excel. This can be useful for creating dashboards that display different data or charts based on the selection of the user.
For example, you could create a dashboard with a chart that shows the sales for different products and regions. You could then insert a check box for each product and region and link them to the chart. Users could then click on the checkboxes to select the products and regions that they want to see. The chart would then be updated to show the sales for the selected products and regions.
To create a dynamic dashboard using check boxes, follow these steps:
Create a chart that shows the data that you want to display.
Insert a check box for each product or region and link it to a cell.
Use the IF function to create a formula that returns a value based on the selection of the user. For example, the following formula would return the sales for the selected product:
=IF(C2=TRUE,SUM(B:B),0)
where C2 is the cell that contains the check box value and B:B is the range of cells that contains the sales data for the selected product.
Use the formula in the Data Series Values box of the chart.
Now, when you click on the check boxes, the chart will be updated to show the data for the selected products and regions.
Leave a Reply