How To Send Email From Excel?
You might have Gmail or Yahoo accounts for sending and receiving emails. But, Excel offers the option to send emails directly from Excel itself. Suppose, you are busy with some Excel application and want to send an email to your manager or team member attaching the same Excel document you are working on. You can complete it in seconds without opening your Yahoo or Gmail inbox.
Send Email
Step 1. Open Excel and save your file as email.xlsx.
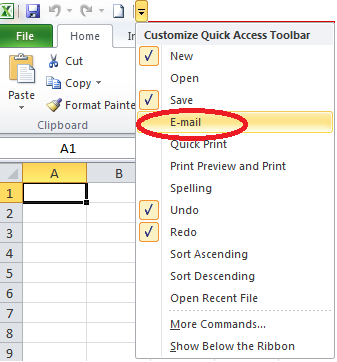
Step 2. Go to the quick access tool bar and click E-mail (circled in red).

Now your quick access toolbar will look like this with an email icon.
![]()
Step 3. Click the email icon from the quick access toolbar and it will open your default email program. Here, Microsoft Outlook is the default email program and it gets opened.

You could see that your default email address has been filled automatically in the From address. The subject is automatically filled in as the name of your Excel file and the same Excel file has been attached in the attachment section.
Step 4. If you want to change the from address click the From dropdown and click Other E-Mail address. In the new window, enter your email address in the textbox provided and click OK.
Step 5. Enter the email address of the recipient in the To textbox. You can also specify cc email ids if you want. If you want to change the subject, then change it.
Step 6. If you do not want to send the Excel file as an attachment or if you want to send another attachment, select the attachment from the textbox.

Press the DEL button on your keyboard. If you want to attach another file, go to Message (main menu in Outlook) –> Attach File (in the Include category) and select the file you want to attach.

If your default email program is not Microsoft Outlook, then these options could be different.
Step 7. Enter your message in the space provided below the attachment option.
Step 8: Once all of the details have been entered, click the Send button to send your email to the recipient(s) you specified.

You might have to specify the server name, user name and password for sending emails directly from Excel.
Make your own function
Instead of using the built-in Email sending feature of Excel, you can also write your own function to send emails.
Step 1. Enter data as shown in the following image:

Enter the to address (separated by comma if more than one) in cell B1, the subject of your email in cell B2, your message in cell B3 and the full path to your attachment in cell B4 (eg: C:\Test\tt.txt).
Step 2. Press Alt + F11 which will open the VBA editor. Click Sheet1 from the left window.

Step 3. Enter the code given below in the window that opens.
Sub CreateMail()
Dim objOutlook As Object
Dim objMail As Object
Dim rngTo As Range
Dim rngSub As Range
Dim rngMessage As Range
Dim rngAttachment As Range
Set objOutlook = CreateObject(“Outlook.Application”)
Set objMail = objOutlook.CreateItem(0)
With ActiveSheet
Set rngTo = .Range(“B1”)
Set rngSub = .Range(“B2”)
Set rngMessage = .Range(“B3”)
Set rngAttachment = .Range(“B4”)
End With
With objMail
.To = rngTo.Value
.Subject = rngSub.Value
.Body = rngMessage.Value
.Attachments.Add rngAttachment.Value
.Display ‘Instead of .Display, you can use .Send to send the email _
or .Save to save a copy in the drafts folder
End With
Set objOutlook = Nothing
Set objMail = Nothing
Set rngTo = Nothing
Set rngSub = Nothing
Set rngMessage = Nothing
Set rngAttachment = Nothing
End Sub
Step 4. Click the Save button which will open a new window.

Click the Yes button.
Step 5. Click the Run button.
![]()
This will open your default email program with all the details filled in. You just need to click the Send button to send an email.
Note: Before using VBA to send emails, you need to enable the Outlook Object Library in the VBA editor. To do this, click on “Tools” > “References” and select “Microsoft Outlook Object Library” from the list.
Using a third-party add-in
There are several third-party add-ins available that allow you to send email from Excel. Some popular add-ins include:
- AbleBits
- Mail Merge Toolkit
- SendBlaster
You can download and install these add-ins and follow their instructions to send email from Excel.
These add-ins can provide more advanced email capabilities than the built-in Excel and Outlook features, such as mail merge functionality, customizable email templates, and scheduling options. Here are the steps to send email from Excel using a third-party add-in:
- Choose a third-party add-in that meets your email requirements. Some popular add-ins include AbleBits, Mail Merge Toolkit, and SendBlaster.
- Download and install the add-in on your computer following the vendor’s instructions.
- Open the Excel file containing the email data and navigate to the worksheet containing the email addresses.
- Select the range of cells containing the email addresses.
- Open the third-party add-in from the Excel ribbon or menu.
- Choose the email template you want to use or create a new one.
- Customize the email content and format, including the subject line and message body.
- Choose the recipients of the email, either by selecting the cell range containing the email addresses or importing a list of recipients from an external file.
- Configure any additional email settings, such as attaching files or scheduling the email to be sent at a specific time.
- Click “Send” or “Send and Close” to send the email.
Note that the exact steps may vary depending on the specific third-party add-in you are using. Always refer to the vendor’s documentation or support resources for more detailed instructions.


CatherinaWeX
I needed that. Thank you so much