How to create Tables in Excel
Tables are a great way to organize and analyze data in Microsoft Excel. In this article, you will learn how to create and manage tables in Excel.
Creating a table
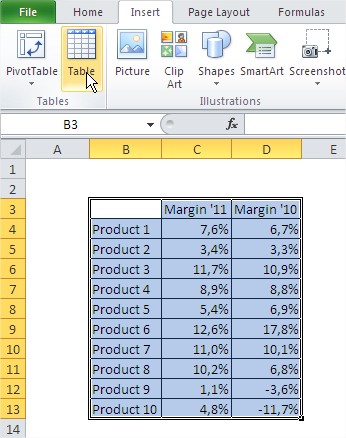
Select the data that you want to include in the table.
On the Insert tab, click Table.

In the Create Table dialog box, make sure that the range of cells that you selected is selected in the Range box.

Excel will add a table border and headers to the data that you selected. You can also add additional formatting to the table, such as changing the font, font size, or table style.

Use the Table Tools -> Design.
You can easily change the style of the table, for example, selecting a very liked by some people alternate coloring of rows.

By clicking on the table right mouse button and selecting Table a Row Totals columns will add Totals Row to table.

After entering the cell is a summary of what you can change the formula will be used in that cell.

Sorting and Filtering Data
Tables offer significant advantages when it comes to sorting and filtering data. When you sort or filter data in a table, both the formatting and any formulas in summary columns adapt accordingly. Here’s how to sort data in ascending order based on a column:

As you can see the formatting has been adjusted to the new layout data. That data is sorted is determined by adding the filter to the symbol in cell D3 up-arrow (sort ascending).
The tables also have such a property that, if the screen scrolls down the column headers that are no longer visible replace the letters denoting the column.

This works only when the active cell is in the Table.

Converting Back to a Range
To convert the table back to a range of data, click any cell in the right and select Table and Convert to range.

Click Yes.

Since then you have to deal with the usual range, the format remains, but will not automatically change according to changes in the system data.


Judson
What’s up it’s me, I am also visiting this site daily, this web is genuinely pleasant and the people are really sharing nice thoughts.