How to create checkbook register in Excel
Creating a checkbook register in Excel is a practical way to keep track of your financial transactions, including checks written, deposits, and account balances. Here’s a step-by-step guide on how to create a basic checkbook register in Excel:
Step 1: Open Excel
Open Microsoft Excel on your computer. You can use Excel in Windows, macOS, or online through Microsoft 365.
Step 2: Create a New Workbook
Click on “File” or “New” (depending on your Excel version). Select “Blank Workbook” to create a new Excel spreadsheet.
Step 3: Set Up the Header
The header will contain column labels for various details of each transaction.
- In cell A1, type “Date”.
- B1, “Transaction Type” (e.g., Check, Deposit, Withdrawal).
- C1, “Payee/Payer”.
- D1, “Description” (optional but helpful).
- E1, “Check # / Reference #”.
- F1, “Withdrawals (-)”.
- G1, “Deposits (+)”.
- H1, “Balance”.

Step 4: Format the Header
Format the header row to make it stand out.
- Select cells A1 to H1.
- Go to the “Home” tab.
- Change the font size, style, and color as desired.
- Apply bold formatting.
Step 5: Set Up the Starting Balance
In cell H2, enter the starting balance of your account (if applicable). This balance will be the initial balance before any transactions are recorded.

Step 6: Record Transactions
Start entering your transactions below the header:
- In cell A2, enter the date of the first transaction.
- B2, specify the transaction type (e.g., Check, Deposit, or Withdrawal).
- C2, indicate the payee or payer.
- D2, enter a description of the transaction (optional).
- E2, check number or reference number.
- F2, amount for withdrawals, using a negative sign (-) before the amount.
- G2, amount for deposits as positive values (+).
- H2, calculate the new balance by adding the previous balance (cell H1) to the deposit and subtracting the withdrawal, e.g.,
=H1+F2+G2.

Step 7: Autofill for Additional Transactions
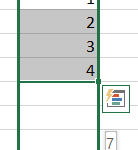
After recording the first transaction, you can use Excel’s autofill feature to quickly add more transactions. Click on the bottom-right corner of cell H2 (the small square, known as the fill handle), and drag it down to create additional rows for transactions.
Step 8: Format the Cells
Format the cells for currency and date to make the register more user-friendly:
- Select the columns containing the transaction amounts (columns F and G).
- Apply the currency format (usually found in the Number format dropdown on the Home tab).
- Select the columns containing the dates (column A).
- Apply the date format.
Step 9: Add Summaries and Totals (Optional)
You can add summary sections, such as the total withdrawals, total deposits, and ending balance, at the bottom of the register using Excel’s functions like SUM and the balance formula as described earlier.
Step 10: Customize as Needed
You can further customize your checkbook register by adding additional columns or features, like categorization, filtering, or conditional formatting for specific transactions.
Step 11: Save Your Checkbook Register
Save your Excel workbook to your desired location and give it a meaningful name (e.g., “Checkbook Register”). This will allow you to access and update your financial records whenever needed.
Remember to update your checkbook register regularly with new transactions to maintain an accurate record of your finances.


Lee
Super helpful tips in setting up a checkbook account for the first time. Many thanks!!