How to Create a Tornado Chart in Excel: Complete Step-by-Step Guide
Tornado diagrams, or tornado charts, are modified versions of bar charts and are also one of the classic tools of sensitivity analysis used by decision makers to get a quick overview of the risks involved. In other words, a tornado diagram or chart shows a financial analysis for a project.
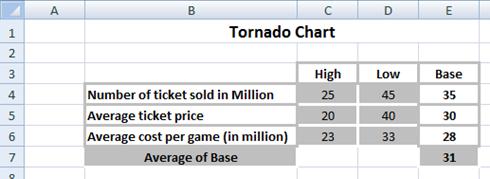
To build an Excel data table structure for your tornado analysis, start by organizing the information in the format shown below:

The data ranges are shown in rows 4, 5, and 6.High to low, the base value column shows average expected values. A low value for an uncertainty is the value where there is only a 10% estimated chance that the realized value will be less than said value. A This sensitivity analysis methodology establishes the upper and lower boundaries where there is approximately a 10% chance the actual outcome will fall outside these sensitivity analysis parameters and estimated ranges.
How to insert a Tornado Chart?
So, once you set up the data in a table like the one shown, here are the steps to construct a tornado chart:
1. Select the data, excluding the Base column

2. On the Insert ribbon, choose Bar. Pick a Clustered Bar (the first one in the 2-D section).

Right-click on the horizontal axis and choose Format Axis.

3. At the bottom of the Axis Options pane, look for Vertical Axis Crosses. Choose the Axis value radio button, and type your base case value (31 in our example, average of base values).

4. Without closing the window, click on any of the bars, which should bring up the Series Options pane. Adjust the sliders for Series Overlap & Gap Width accordingly.

That’s it! Now you can format the chart as you like. The final tornado chart in Excel should look like the chart shown below.


Leave a Reply