How to Use Data Validation in Excel to Control User Input and Prevent Errors
In this Excel tutorial, you’ll learn how to use Data Validation to control what users can enter in your spreadsheet – ideal for shared documents or data-sensitive Excel forms.
Why is data validation needed?
Data Validation in Excel is a built-in feature that restricts the type of data users can enter into a cell – helping you prevent errors, typos, and inconsistent formatting. Thanks to data validation, we have the option of limiting the possibilities of entering data and allowing data to be entered only in a format that suits us.
Data Validation content
Let’s move on to an overview of the content of the tabs that we can find in the correctness of the data.
Settings
In the Settings tab, you can find eight different options that I discuss below.
- Any Value – no validation
- Whole Number – allows you to enter numbers according to the criteria given below (e.g., between min and max values)
- Decimal – use this to allow decimal numbers within a specified range (e.g., prices or scientific data).
- List – a drop-down list
- Date – criteria for dates
- Time – Same for the time-related data type
- Text Length – limits on the length of the text in the cell
- Custom – create advanced data validation rules in Excel using your own formulas (e.g., =A2>A1 or =ISTEXT(A1)). Excel gives you almost unlimited possibilities, so this option meets the expectations of even the most demanding analysts
Input message
In the input message tab, you can enter a message for the user. Often times, entering an input message is necessary because the user may not know what to type in the cell.
Error alert
You can define three types of alerts: Stop, Warning or Information.
The Error Alert tab in Data Validation allows you to show a custom error message when someone enters invalid data – guiding users to correct entries. In this case, it is a message about an incorrect input of data by the user and information that the content of the cell does not comply with the format defined by us.
The user has to correct the contents of the cell. Otherwise, he will not be able to enter the data. This is what the stop alert says.
Alternatively, you have the option of defining a warning or just providing information. In this case, you can accept the data entered by the user and limit yourself to just warning the user or informing them that you expected the data in a different format.
In practice, the stop alert is most often used.
Next, you can learn how to validate data in Excel with step-by-step examples.
Examples of Data Validation Usage
Example 1 – Enter positive integers
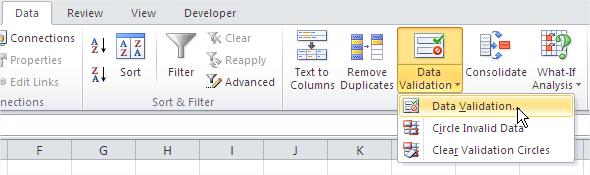
Select a portion of the sheet, which you establish criteria for. Go to Ribbon. Select Data and click Data Validation.

In the Settings tab, set the criteria, as in the following screenshot.

In the Input Message tab, enter the message that appears when you select a cell in the area controlled by the validation.

Error Alert appears when a user types a number that does not meet the conditions imposed (e.g., negative, fraction, zero).

You can also set the Style, which is a reaction to the validation. Excel provides three styles: Stop, Information and Warning. Only the Stop warning is a way to not allow the user to enter an invalid value. Information and Warning styles allow for such a possibility.

Let’s see how it looks in your worksheet. Now you see a comment in the cell.

After entering the number which is less than 0 appears alert message. Data Validation effectively blocks negative numbers or decimals when you only want to allow positive whole numbers in Excel.

Example 2 – Entering a specific number of characters
This approach will be useful, for example, when you enter social security numbers, or in cases where the user has to enter a fixed number of characters. Excel reports an error if the entry gets longer or shorter.

Example 3 – Entering only the current date
If you use the date function =TODAY() so the procedure will cause the user to be able to enter only the current date.

If the cells are filled with consecutive dates with any of the options Copy-Paste data validation rules will not work! Validation works only for the data entered from the keyboard!
Example 4 – drop-down list
If you are completing the data sheet with the same information (e.g., days of the week, months), you can use a drop-down list to validate.
First, prepare a list of all possible options. In this example, these are the days of the week. Then, on the Settings tab, select the Source list and select a cell address.

Drop-down list works like that:

Example 5 – Accepting text only
To get the selected cell where you could only enter text (no numbers), use the following formula:
=ISTEXT(A1)

Example 6 – Acceptance of a value only if it is greater than the value in the previous cell
The following formula for verifying the accuracy of the data allows the user to enter the cell only a value that is greater than the value contained in the cell located directly above it:
=A2>A1

Excel’s Data Validation tool helps keep your spreadsheets clean, consistent, and accurate – essential for reports, forms, and data-driven models.


Leave a Reply