
How to Insert Page Numbers in Excel: The Ultimate Step-by-Step Guide
Most people place page numbers in the footer, but you can choose any location – the header, body, or even within a cell (though this requires advanced VBA). Always remember that pages are printed settings, not data cells!
Adding page numbers is an essential skill for professionals who work with large reports. Proper numbering ensures readers can reference specific information accurately. This guide covers the standard method using Headers & Footers, plus advanced techniques to control where and how your pages are numbered.
Method 1: Adding Page Numbers via Header & Footer
This is the most reliable and standard way to add page numbers that appear correctly when printed.
Step 1: Access the Header/Footer Area
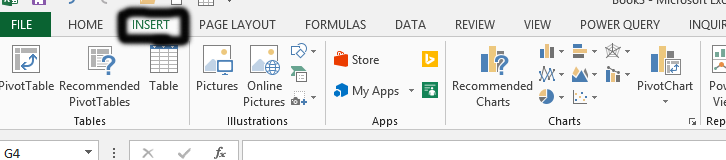
- Go to the Insert tab in the Excel ribbon.
- In the Text group, click on Header & Footer. (This action automatically switches you into “Page Layout View,” which is where you need to be.)


Step 2: Insert the Page Number Field
- While still in the Header/Footer editing mode, click on Number of Pages (or similar page icon).
- Excel will automatically insert a special field code that tells Excel “Insert the current page number here.”

Step 3: View and Exit
- You can now type accompanying text (e.g., “Page X of Y”).
- Click anywhere back into a normal cell on the spreadsheet to exit Header/Footer mode. The page numbers are now active!
Advanced Control: Making Page Numbers Professional
Professional documents often need more than just a number. Here’s how to control the numbering style:
Controlling Page Number Placement
- Page X of Y (The Best Way): Type “Page “, then click Insert > Current Page(). Then, type ” of “, and finally click Insert > Number of Pages.
(Example: Page 5 of 20)
Controlling Start/End Points
What if you only want the numbering to start on Chapter 3 (Page 10)?
- Go to Review > Breaks and select Breaks.
- Use Section Break before your chapter begins. This tells Excel that a new “section” starts, allowing you to format headers/footers for only that section.
Dealing with Odd/Even Pages
For formal documents (like reports or manuals), page numbering often needs to skip the number on the cover page or use Roman numerals for introductory sections.
- First Page Different: In the Header & Footer tools, look for an option that says “Different First Page.” Checking this will allow you to keep your title page blank of numbering.
Troubleshooting: Why Aren’t My Numbers Printing?
If the numbers look correct in Excel but don’t appear on paper, it’s almost always a Page Setup issue.
Check 1: Print Area Configuration
Ensure your entire document area is defined for printing. Go to the Page Layout tab and use Set Print Area. This tells Excel exactly what boundaries to print, ensuring the page numbers fall within those boundaries.
Check 2: Reviewing Page Breaks
Go to View > Page Break Preview. This mode shows you how Excel will cut your document. If the layout looks wrong here, adjust column widths or insert breaks manually to force a cleaner print break and page number placement.
Quick Reference Checklist
Page numbers on all sheets? → Insert > Header & Footer
Numbering only from Page 3? → Use Breaks (Review Tab) and configure the header for that section.
Skip numbering on the cover page? → Check the “Different First Page” option in the Header/Footer Tools.


Leave a Reply