Creating UserForms in Excel
Microsoft Excel provides a built-in tool called UserForms that allows you to create custom data entry forms and dialog boxes. UserForms can enhance the user experience by simplifying data input and interaction within your Excel workbooks. We will guide you through the process of creating and using UserForms in Excel.
Understanding UserForms
A UserForm is essentially a custom dialog box or form that you can design to collect and display information. It typically consists of various form controls like text boxes, labels, buttons, and combo boxes. You can create UserForms to:
- Streamline data entry by presenting a structured and user-friendly interface.
- Ensure data accuracy and consistency by validating input.
- Automate complex tasks and calculations based on user input.
- Enhance the aesthetics and professionalism of your Excel applications.
Creating a UserForm
Here are the general steps to create a UserForm in Excel:
- Open Excel and go to the worksheet where you want to add the UserForm.
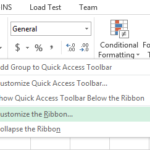
- Enable the “Developer” tab in the Excel ribbon (if not already enabled). You can do this by going to File → Options → Customize Ribbon and checking the “Developer” option.
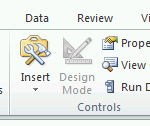
- Click on the “Developer” tab in the ribbon.
- Click on “Insert” in the “Controls” group and select “UserForm”. This will open the UserForm editor.
- In the UserForm editor, you can add form controls from the toolbox on the left by dragging and dropping them onto the UserForm.
- Customize the form controls by setting properties such as names, labels, default values, and validation rules.
- Write VBA (Visual Basic for Applications) code to handle events triggered by UserForm controls, such as button clicks or data validation.
- Display the UserForm by running your VBA code or assigning it to a button or worksheet object.
Example: Creating a Simple Data Entry UserForm
Here’s a step-by-step example to create a basic data entry form:
- Enable Developer Tab (as described above).
- Create a UserForm.
- Drag and drop a TextBox (for data entry) and a CommandButton (to submit data) from the toolbox onto the UserForm.
- Change the Name property of the TextBox to txtInput.Change the Caption property of the CommandButton to Submit and its Name to btnSubmit.
- Double-click the CommandButton to open the code window. Enter the following code to handle the button click event:
Private Sub btnSubmit_Click()
Dim inputData As String
inputData = txtInput.Value
' Perform any data processing here
MsgBox "You entered: " & inputData
Unload Me
End Sub
Insert a new module by clicking Insert → Module in the VBA editor. Add the following code to display the UserForm:
Sub ShowUserForm()
UserForm1.Show
End Sub
Run the ShowUserForm macro to display your UserForm.
Using UserForms for Data Entry
Once you have created a UserForm, you can use it for data entry in the following way:
- You can trigger the UserForm to appear when a specific action is taken, such as clicking a button or opening a workbook.
- Users can input data into the UserForm’s controls, and you can implement data validation to ensure data accuracy.
- Use VBA code to process the data entered into the UserForm. This may involve calculations, data storage, or other tasks.
- You can display messages or results on the UserForm to provide feedback to users after data entry.
- Users can close the UserForm when they have finished data entry or other interactions.


